|
eValid™ -- The Web Quality Suite
Browser-Based Client-Side Functional Testing and Validation
Page Timing/Tuning Transaction Monitoring.
WebSite Spidering & Analysis and Realistic Server Loading.
|
|
eValid -- Manual Script Creation Process
eValid Home
Overview
There are no general rules for how to do this,
but the process for creating a reliable, DOM-based script
generally involves one or more of the steps below.
We find in practice that it is best to start with a recorded script
-- a script recorded from the actual application
-- and then modify it to accomplish specific test goals.
Here is the set of
Structural Testing Commands
that are used very often in modifying a script to meet DOM-based needs.

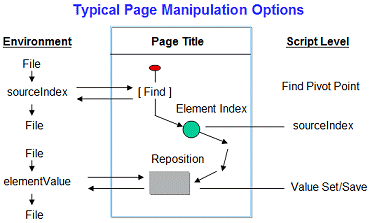
Typical Steps Described
- Find Page Pivot Point
Using the IndexFind or IndexFindEX commands to find the
find a place within the page to use as a pivot for your actions.
You may need to search to find a specific type of element,
or an element with a specific ID tag, or an element with some other property.
Once the search ends you have a value for the sourceIndex that you can use later.
- Reposition Index
Very often the actual target of the action you want to take is near (above or below)
the pivot element.
Use the IndexMove command to reposition the sourceIndex
up or down from the pivot point to the specific target location.
- Validate Location
It is a good practice, once the movement within the page has been completed, to
validate that
you have the right spot -- before taking an action.
You can do this with any of the eValid validation commands,
or in particular with the
very-focused IndexValidateObjProperty command.
- Read Element Value
If you have previously stored it in a local file, you can
read the data to be used from local file memory prior to storing the elementValue into
a page element.
- Choose Action
There are many kinds of actions you can take on a page, but you must
be careful to
choose the right type of action for the element at which you now have placed focus.
Not every element in a page responds to every kind of signal, so care must be taken
in using the IndexElementEvent command to make sure that the action matches the page.
- Take Action
Now, you can take the action required and await results as the eValid browser responds.
- Synchronize Response
It is good practice to synchronize the playback process so that the response generated
earlier has resulted in the correct page being loaded.
This is particularly important in an AJAX page where the response is likely to
be asynchronous.
You probably will want to use a SyncOnSelectedObjProperty command for this.
Note that there are
three positive and three negative variations of how to achieve synchronization.
- Validate Result
Now that the result page has stabilized,
you can Validate that the action produced the desired result.
You can do this with any of the eValid validation commands,
or in particular with the
very-focused IndexValidateObjProperty command.
- Extract & Save Data
If you wish, you can extract and save elementValue information and sourceIndex values
into files stored in local memory.
- Continue or Not?
Now you're ready for the next sequence in your test plan.
Go gack to Step No. 1.
